Honda Twister Cbx 250 Manual
DOWNLOAD 1. 97. 0 2. Honda Motorcycle Service Manuals Owners Manual. Honda Motorcycle Troubleshooting Searches CLUTCH INFORMAITONThe purpose of the clutch is to smoothly disengage and engage the engine from the rear wheel for starting, stopping and shifting gears. Novedades. Honda Motor de Argentina ampla la exportacin de motocicletas. Desde septiembre, la Honda Tornado XR250, modelo exclusivo regional, se exporta a nueve. Ttulo tamao descargarhonda1252004manual del propietarioesp 0. History. Throughout his life, Hondas founder, Soichiro Honda, had an interest in automobiles. He worked as a mechanic at the Art Shokai garage, where he tuned cars. Na CASA DAS MOTOS em Praia GrandeSP, voc encontra carros novos e usados para comprar, com grande variedade de marcas e modelos. Confira Financiamos seu veculo. Download Manual Servio Shadow VT750C 2V 1997 clique aqui Manual Servio CB1300 Injetada 2008 clique aqui Download ManualServicos. XL600. XL650V. XR750. AfricaTwin. Conocimiento general necesario sobre mecnica Tambin recomiendo leer la explicacin de cmo funciona el carburador para saber que estamos modificando, igualmente. The clutch is a wet, multiple disc clutch with steel plates and fiber friction plates stacked alternately in the clutch shell. The pack consists of seven fiber plates, seven steel plates, one narrow fiber plate, one damper spring and one damper spring seat. The fiber plates clutch driving plates are keyed to the clutch shell, which is driven by the engine through the primary chain. The steel plates clutch driven plates are keyed to the clutch hub, which drives the rear wheel through the transmission and secondary drive belt. When the clutch is engaged clutch lever released, the diaphragm spring applies strong force against the pressure plate. The pressure plate then presses the clutch plates together causing the plates to turn as a single unit. The result is that the rotational force of the clutch shell is transmitted through the clutch plates to the clutch hub. As long as the transmission is set in a forward gear, power from the engine will be transmitted to the rear wheel. When the clutch is disengaged clutch lever pulled to left handlebar grip, the pressure plate is pulled outward by clutch cable action against the diaphragm spring, thereby compressing the diaphragm spring. With the pressure plate retracted, strong inward force no longer squeezes the clutch plates together. Honda motorcycle service manuals, parts manuals and technical specifications. Una pequea gran moto. La Honda CBF 250 llamada CBX Twister en otros mercados fue la substituta de la archi conocida cb 250, que tras 10 aos en produccin, y de. Caro Amigo Pupo Tenho um Honda 125 Ml ano 85. Esta muito original, cuido muito bem, apesar de ser uma moto de uso diario. Quero restaurar, preciso fazer pintura do. The fiber plates are now free to rotate at a different relative speed than that of the steel plates i. Slippage between the clutch plates occurs. The result is that the rotational force of the clutch shell is no longer fully transmitted through the unlocked clutch plates to the clutch hub. The engine is free to rotate at a different speed than the rear wheel. CLUTCH TROUBLESHOOTINGCLUTCH SLIPSIncorrect clutch release adjustment. Check and adjust clutch release mechanism. Worn clutch plates. Check service wear limits. Replace plates. CLUTCH DRAGSIncorrect clutch release adjustment. Check and adjust clutch release mechanism. Worn clutch release ramps or balls. Replace release ramps andor balls. Warped clutch steel plates. Replace clutch steel plates. Blade worn or damaged clutch gear splines. Replace clutch gear or hub as required. Overfilled primary. Drain lubricant to correct level. COMPRESSION TESTSatisfactory engine performance depends upon a mechanically sound engine. In many cases, unsatisfactory performance is caused by combustion chamber leakage. A compression test can help determine the source of cylinder leakage. A proper compression test should be performed with the engine at normal operating temperature when possible. Disconnect spark plug wires. Clean around spark plug base and remove spark plugs. Connect CYLINDER COMPRESSION GAUGE Part No. HD 3. 32. 23 1 to front cylinder per manufacturers instructions. Make sure transmission is in neutral. With throttle plate in wide open position, crank engine continuously through 5 to 7 full compression strokes. Note gauge readings at the end of the first and last compression strokes. Record test results. Connect CYLINDER COMPRESSION GAUGE to rear cylinder and repeat Steps 3 and 4. Compression is normal if final readings are within the range specified in Table 3 2. Bar variance between cylinders. If compression is below 1. Bar for 1. 10. 0 cc engines or 1. Bar for 1. 20. 0 cc engines. Inject approximately 12 oz. SAE 3. 0 engine oil into each cylinder and repeat the compression tests on both cylinders. M_jq7ocvk/S9jK8wQkERI/AAAAAAAAEns/GIKxRJMfMW0/s1600/Manual+de+Montagem+da+Honda+CBX250+Twister.jpg' alt='Honda Twister Cbx 250 Manual' title='Honda Twister Cbx 250 Manual' />
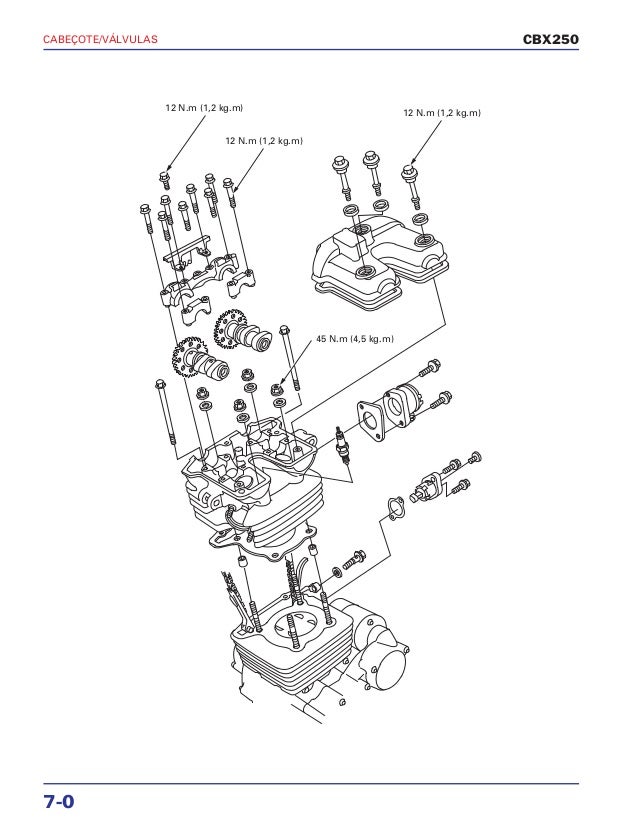
 Providing Honda motorcycle service repair manuals and owners manuals for every Honda motorcycle or street bike ever produced between the years 1970 through 2011. Readings that are considerably higher during the second test indicate worn piston rings. NOTE After completing the compression tests and reinstalling the spark plugs, make sure the throttle plate is in the closed position before starting the engine. COMPRESSION TEST RESULTSRING TROUBLECompression low on first stroke, tends to build up on the following strokes, but does not reach normal. Improves considerably when oil is added to cylinder. VALVE TROUBLECompression low on first stroke, does not build up much on following strokes. Does not improve considerably with the addition of oil. Check for correct pushrod length. HEAD GASKET LEAKSame reaction as valve trouble. CYLINDER LEAKAGE TESTThe cylinder leakage test pinpoints engine problems including leaking valves, worn, broken or stuck piston rings and blown head gaskets. The cylinder leakage tester applies compressed air to the cylinder at a controlled pressure and volume and measures the percent of leakage from the cylinder. Use CYLINDER LEAKDOWN TESTER and follow the specific instructions supplied with the tester. The following are some general instructions that apply to Honda motorcycle engines 1. Run engine until it reaches normal operating temperature. Stop engine. Clean dirt from around spark plugs and remove the spark plugs. Remove the air cleaner and set the throttle in the wide open position. The piston in the cylinder being tested must be at top dead center of compression stroke both valves closed during the test. To keep the engine from turning over when air pressure is applied to the cylinder, engage transmission in fifth gear and lock the rear brake. NOTE Before performing the cylinder leakage test, verify that the tester itself is free from leakage to obtain the most accurate test results. Running Man Episode 171 Indo Sub. With a soap solution applied around all tester fittings,connect the cylinder leakdown tester to the compressed air source and look for any bubbles that would indicate leakage from the tester. Following the manufacturers instructions, perform a cylinder leakage test on the front cylinder. Make a note of the percent of leakage. Leakage greater than 1. Listen for air leaks at induction module intake, exhaust pipe and head gasket. Air escaping through the induction module indicates a leaking intake valve. Air escaping through the exhaust pipe indicates a leaking exhaust valve. NOTE If air is escaping through valves, check push rod length. Repeat procedure on rear cylinder. NOTE After completing the cylinder leakage tests and reinstalling the spark plugs, make sure the throttle plate is in the closed position before starting the engine. DIAGNOSING SMOKING ENGINE OR HIGH OIL CONSUMPTIONCheck Prior to Cylinder Head Removal. Oil tank overfilled. Oil carryover. 3. Breather hose restricted. Restricted oil filter. Check After Cylinder Head Removal. Htc Touch 2 Sync Software. Oil return passages for clogging. Valve guide seals. Valve guide to valve stem clearance. Gasket surface of both head and cylinder. Cylinder head castings porosity allowing oil to drain into combustion chamber. O ring damaged or missing from oil pumpcrankcase junction. When an engine needs repair, it is not always possible to determine definitely beforehand whether repair is possible with only cylinder heads, cylinders, and pistons disassembled, or whether complete engine disassembly is required for crankcase repair. Front Driver Tire Inside Wear On My Tires here. Most commonly, only cylinder head and cylinder repair is needed valves, rings, piston, etc., and it is recommended procedure to service these units first, allowing engine crankcase to remain in frame. Follow the procedure outlined in TOP END OVERHAUL DISASSEMBLY, Stripping Motorcycle for Top End Repair, to strip motorcycle for removal of cylinder heads, cylinders, and pistons.